
Sentry 3.0 Documentation
Last Revised: April 2011
Fresh Software Support
1-877-838-6565
![]()
10:30 am - 7:30pm CST
Exit Help
|
|
|
Fresh Software Support |
Multi-Computer Deployment Checklist
First Installation to Master Computer
Set up Settings on Master Computer
Set up User Accounts and Permissions
Set up Layouts and Plugins
Make Deploy Folder
Share Deploy Folder
Check and Modify Update Script
Deployment
First Installation to Master Computer
Install Sentry on the Control/Administrative Computer
The default Sentry installer file is sentry30-setup.exe. When run, this installer shuts down any running instances of Sentry with the /r parameter.
After running the setup file, Sentry will install itself to C:\Program Files\Sentry 3.0 by default, and then run Sentry for first configuration.
It is highly recommended to run Sentry immediately after installing to set up a master password. Otherwise, someone could come by your computer later and set it up themselves, and effectively lock you out of your own desktop.
Set up Settings on Master Computer
After setting up a master password, the default layout will load. You can go into Sentry Options and define how you'd like the program to run and behave across your organization.
You will especially want to make sure that the Security settings are the way you want them, and also your User accounts.
Options to consider changing:
Accounts -- Enable Multi-User mode
Security Settings
Network -- Allow Remote IP address (Note: Controlled computers always turned to "on" )
Default Layout and Screensaver
SentryBar appearance and behavior
Set Up User Accounts and Permissions
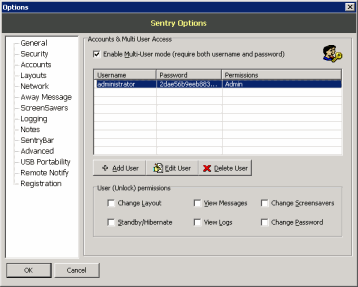
From within the Options menu, click on Accounts to create multiple user accounts and layouts for use across your whole organization.
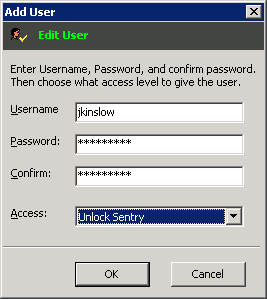
Click Add User to create a new account, and provide a username and password for each user. Then choose an access level for this user. Almost all of your users should have Unlock Access, which gives them the power to unlock Sentry but not change its settings.
 |
 |
Global User permissions are on the bottom --- you'll want to set those, they define how much power those with "Unlock" permissions have.
Set Up Layouts and Plugins
After installation, Sentry creates a layouts folder to store its screen layouts. By default, this is C:\Program Files\Sentry 3.0\layouts.
Under this folder are 2 sub-folders called html (to store web-based layouts) and slf (to store Sentry Layout Format layouts).
Layouts can be edited internally in Sentry (with the F11 key) or with your favorite HTML or text editor.
For more information, see Layouts.
Make Deployment Folder
When the settings are to your liking, go into Options and click the Deployment tab. Click Make Deploy Folder to create the folder C:\SentryDeploy\ , which contains all the files needed to distribute clone-copies of Sentry.
These clones will be responsive to whatever IP address is in the Master IP field (and the ones under "allowed remote IPs" in the Network tab), and can be remotely administrered by Sentry Manager.
If you want to limit the clone computers to the current layout on the master computer, check the Only Copy Current Layout checkbox. Otherwise, you may go into the C:\SentryDeploy folder after the export and manually delete the layouts that you don't want to be included in the cloned-distribution of Sentry.
You can now hit F3 from Sentry's main screen to remake/update the contents of the Deploy folder.
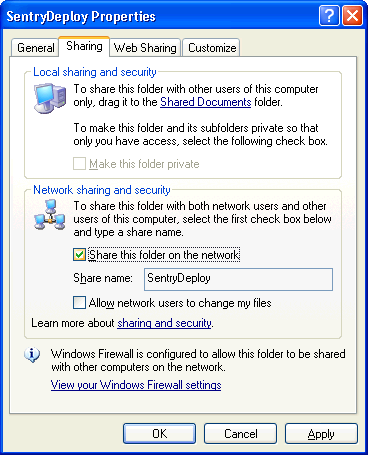
Share Deployment Folder
To share the folder, browse to it in Windows Explorer (or hit Start -> Run and type in C:\SentryDeploy) , then right click in a blank area, and choose Properties.
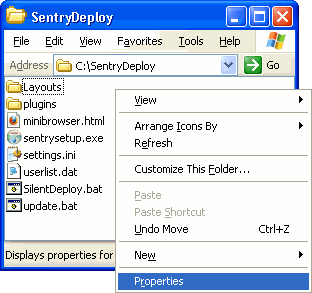
Click the Sharing tab, then check the box that says "Share this folder"
Check and Modify Update Script
The Deploy button creates update.bat , which allows Sentry computers to update (program files, layouts, user lists, etc).
Check that it is to your liking, and modify as needed: C:\SentryDeploy\update.bat
Deployment Installation
Copy and Carry
To proceed with deployment, copy the contents of the folder to the computers you want to install Sentry on. Then, run sentrysetup.exe for a guided installation, or SilentDeploy.bat to have a silent, automatic setup.
You can bring the contents of the SentryDeploy folder to each computer individually (such as on a USB drive or CD-ROM), but it is recommended that you share the folder on the network to make deployment easier:
Network Installation
Share the folder as SentryDeploy with read-only access, as shown above.
Run the setup files remotely on each computer you wish to install Sentry: click Start -> Run -> and type \\computername\SentryDeploy\sentrysetup.exe where computername is the host name or ip address of your computer.
Sentrysetup.exe can be run with command line parameters. See below.
What Happens during Deployment
When the sentrysetup.exe file is run, it looks for a sentrycopy.exe file in the same folder. If present:
It will copy a Layouts folder from the same directory and set it up as the layouts folder for the new Sentry installation.
It will copy a Plugins folder from the same directory and set it up as the layouts folder for the new Sentry installation.
It will copy settings.ini, if present, which Sentry will use to determine its initial settings.
It will copy over screensavers.dat, if present, which Sentry will use to determine allowable screensavers to run.
It will copy over minibrowser.html, if present, to be used as the default Minibrowser mini-layout.
It will copy over userlist.dat, if present, and use it to authenticate Sentry operations. This file contains user accounts.
It will copy over update.bat, if present, and use it to as the Sentry Update script.
When sentrysetup.exe is run with a /S (case sensitive) command-line parameter, it forces a silent installation with no user input. You can use silentinstall.bat to call.
Using a /D parameter will specify a target Sentry installation directory other than the default (C:\Program Files\Sentry 3.0\)
sentry30-setup.exe /S
sentry30-setup.exe /S /D=C:\Program Files\Sentry 3.0\
sentry30-setup.exe /S /D=C:\OtherFolder
Remote Management
You now have Sentry installed on a second, non-master computer. As long is Sentry is running, this computer will appear to you in Sentry Manager.
Updating Sentry
Once Sentry is running on multiple computers from a deployment installation, updating is easy.
Modify the settings within Sentry, including the userlist, and click Make Deploy Folder anytime you want to send out new layouts, settings, or user accounts to the network.
Then, on the target computers, Right click the system tray icon, and select Run Update Script.
Or, run Sentry Manager to tell the target computers to update remotely. Select the computer in the browser, and click Run Update Script.
Notes
The master computer
defines the user accounts used across the network, but you don't
necessarily want your user accounts to unlock the master computer.
To prevent this, click the Only Administrator Can Unlock Master IP settings in Security.
*This setting was introduced in the final version of Sentry 3.0.0. If you
have problems with it, an alternative is to disable user accounts on the
master computer, and/or combine
Sentry with Windows Lock function (Use Windows Lock on Startup)
Sometimes you dont want all
users on the network to be able to lock any computer. To do deal with this,
after deploying, delete user accounts on the local computer that you dont want
to unlock it.
To use the update script, your computers must be in the same workgroup and be configured for file sharing.